Showing posts with label Our Homes. Show all posts

Tuesday, November 22, 2011

A Laundry Folding Table At Last

If I could pick something that has been on my wish list since the twins were born it would be a laundry folding station.  Unfortunately our laundry room in Cincinnati was teeny tiny so it would've required stacking our washer and dryer.

Here is how our laundry folding station happened.  I was at Ikea looking for a butcher block style counter top.  The cheapest one was $39.99, which I was ok with until I found a varde freestanding dishwasher cabinet which has a butcher block top on clearance for $49.99.

ikea varde dishwasher cabinet


 Well, I knew eventually I would want to find something for the random space between my washer and dryer (some weird old house plumbing situation).  I thought to myself,"for 10 bucks more I've got a stand for a solution).  Now for a countertop.  Well, since I was planning to use the butcher block for something else, I had to find a countertop.  I'm sure I would've easily found  something in the as is section, but a non scratch and dent  pragel countertop on clearance for $19.99 in the kitchen section.

ikea pragel countertop


We didn't even have to cut it, just moved the dryer over a little more to make it fit.


laundry room counter


Now we have space for dirty laundry on rollers and our trash bins.  I now have to shop for the perfect trash cans on rollers, one for trash and one for recycle.  Any suggestions?


Special thanks to Elaine and hubby for helping put this together.


xo,


mONICa

Monday, November 21, 2011

Super Simple Ceiling Fan Drum Shade

I have been wanting to fancy up a ceiling fan with a drum shade forever.  I had planned on doing it when we lived in Cincinnati, but my husband never got around to putting the ceiling fan up in our master bedroom.  Well, our rental just happens to have one up in the master so I took when I got my opportunity I ran with it.

I was taking a stroll through Ross the other day and I saw 2 beautiful large lamp shades, both greige, but one lighter and darker.  Why I didn't buy both I just don't know (you can never have enough drum shades).  Well, part of the reason was that neither one of them was marked with a price, so I actually didn't know how much they were so I only took one up to the register.  Lucky for me Ross just goes and grabs something similar when finding a price and the one they found was $5.99.  SCORE!!!

Now off to the task of actually getting this thing on my ceiling fan.  The best tutorial I found was at Thrifty Decor Chick.  You can head over there and read it, she does a great job at explaining it all.  Doesn't hers look great?

Thrifty Decor Chick Ceiling Fan

So off to Home Depot I went to find the parts I needed.  The "threaded connector" ( I will wait for you to go get one so you know the spam real word she was talking about, I laughed when I saw it).  I also got a package of couplings.

Here is what the fan looked like before.


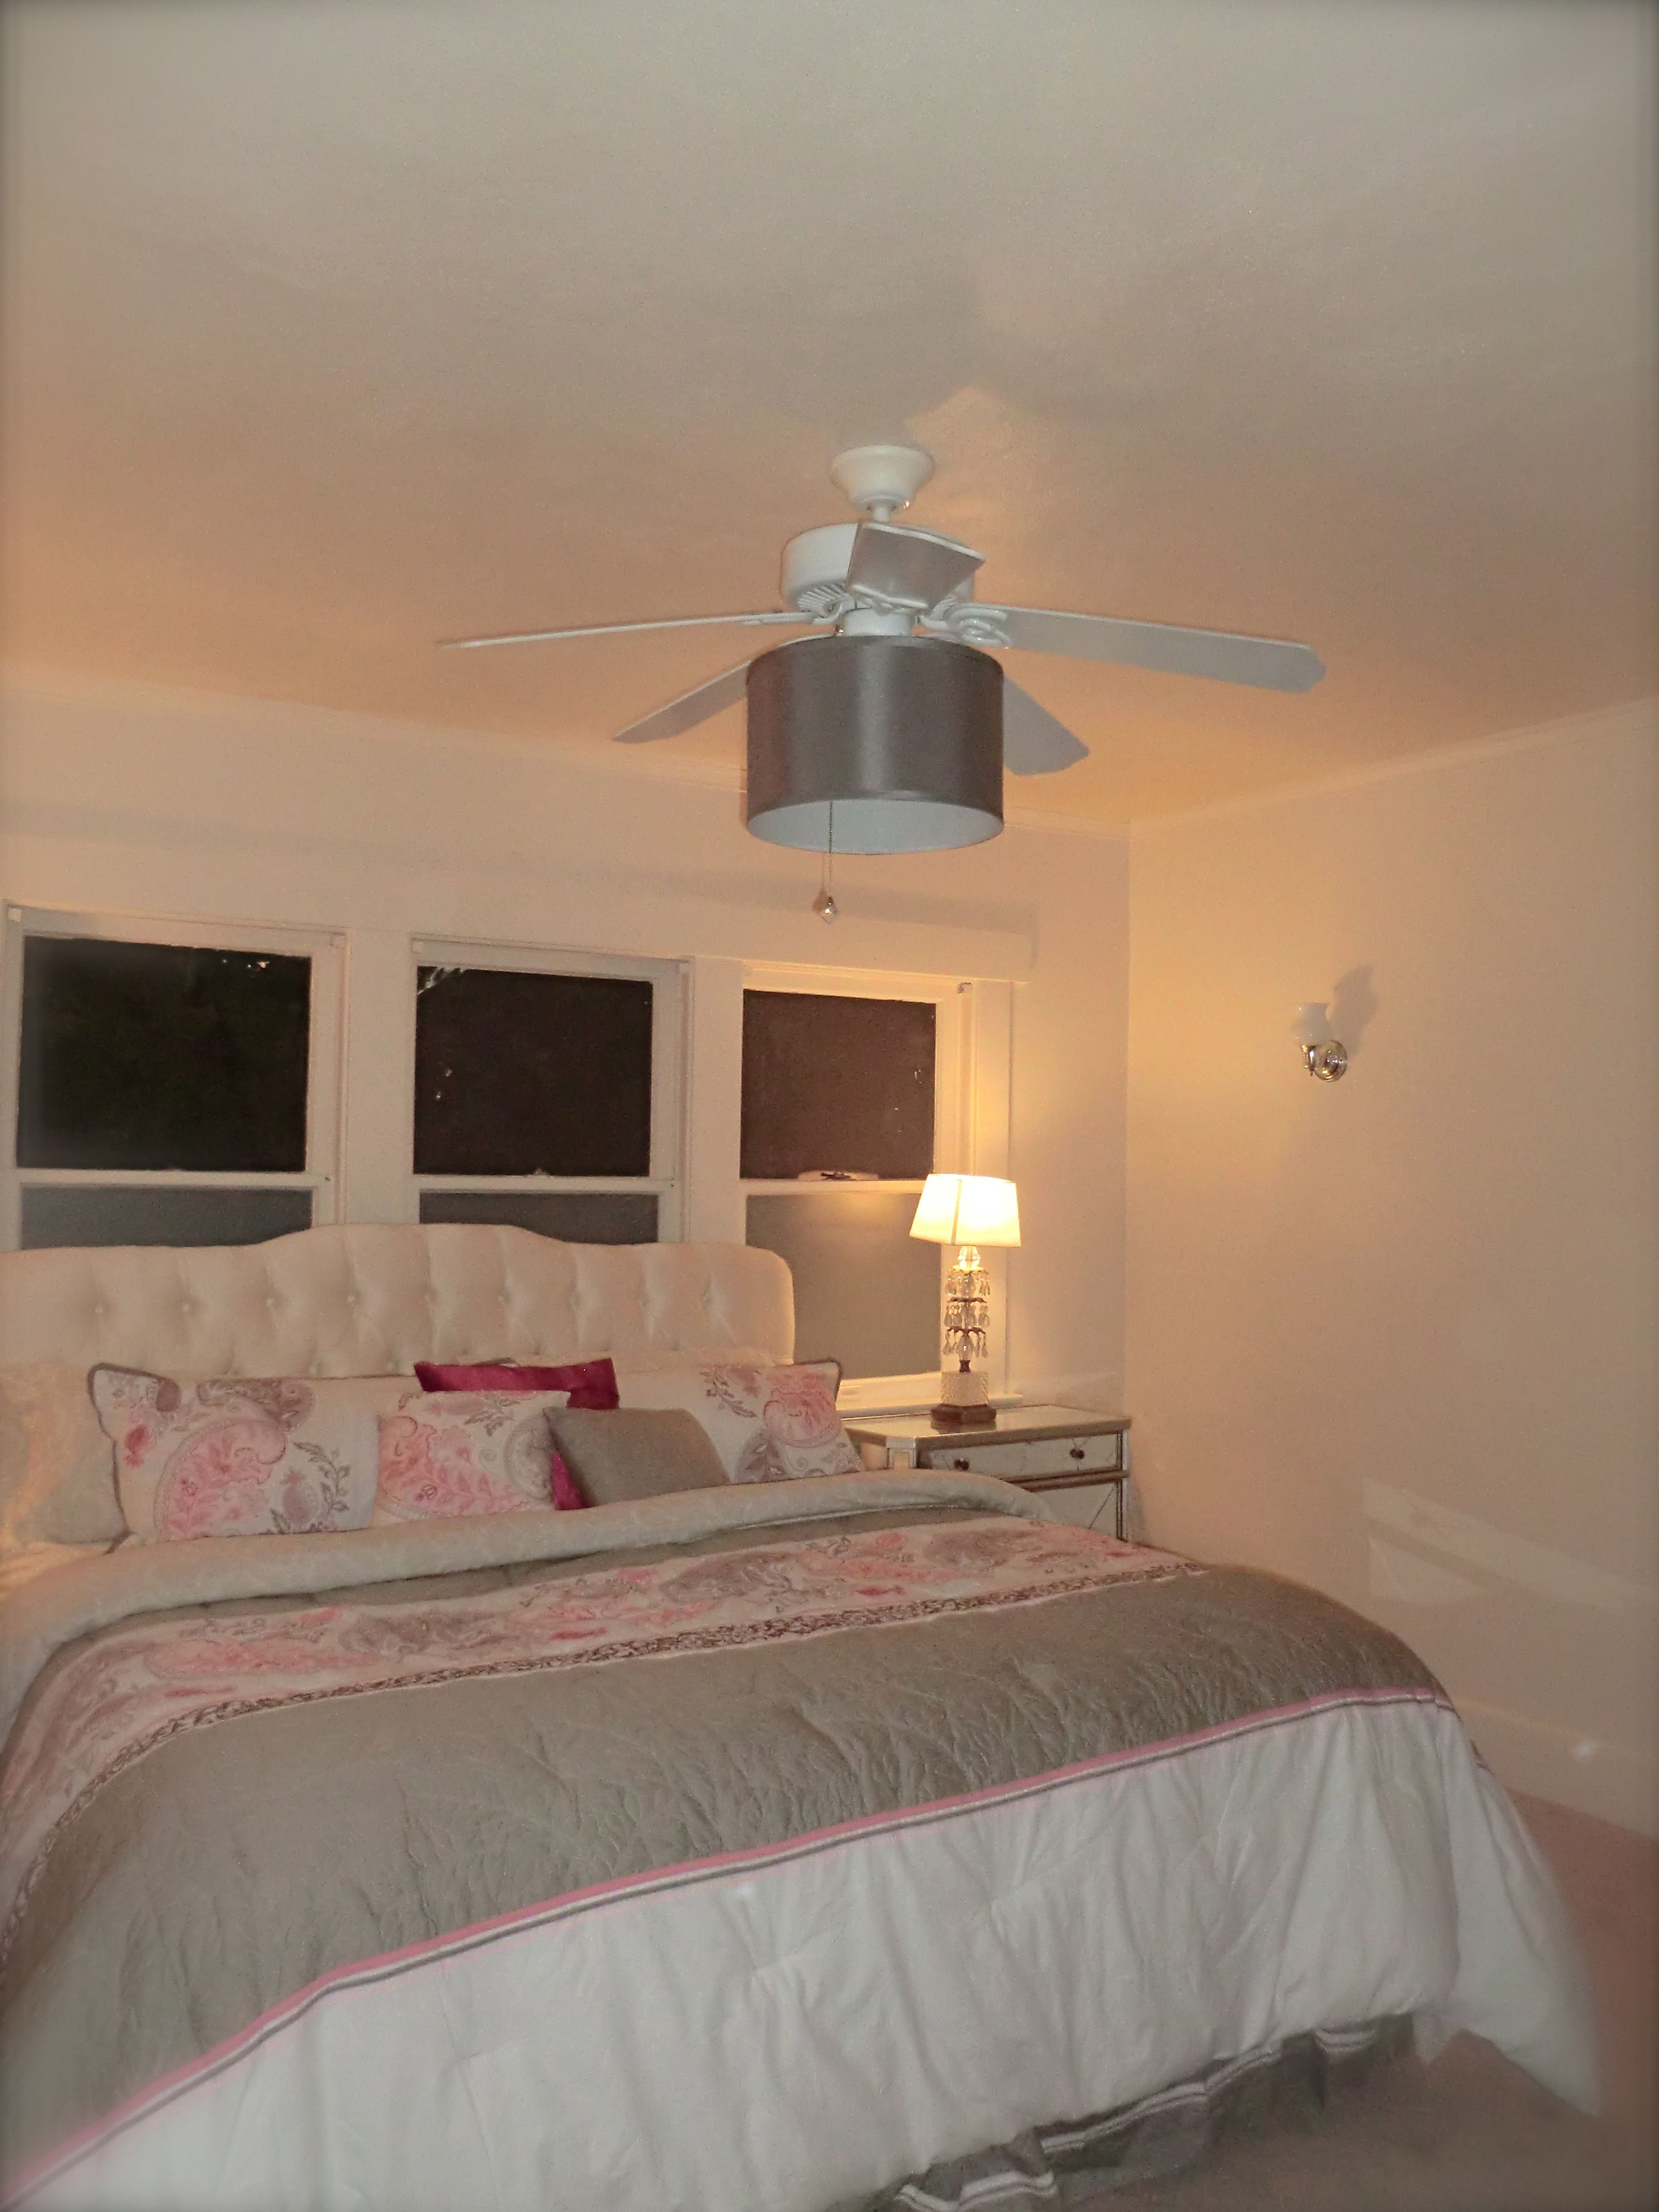
and here is the fan after


ceiling fan drum shade


Now my bedroom is nowhere near ready for a reveal, so bear with me.  At least you can see how the fan looks in the room.  My  comforter is from Home Goods in case you were wondering.


Home Goods Comforter


vintage chandelier lamps


So this ceiling fan cost project cost me a total of $16 if you include the crystal pull I bought to replace the one that was missing when I moved in.  Not bad if I say so myself.


xo,


mONICa

Thursday, November 10, 2011

Introducing Our Little Bungalow

Oh my goodness, with all the chaos lately I realized I haven't even introduced you to my new house.  She is cute.  2 good size bedrooms, a formal dining room, an eat in kitchen, and an indoor laundry room.  Did I mention the 2 car garage?  What more could a girl want?

There is so much to do.  I still have sheets as curtains, but it will all come together in time.  I adore the large front porch.

craftsman bunglaowThere are some beautiful maple trees that I can see out of my bedroom window.  Its a wonderful thing to wake up to in the morning.


maple trees


It's a little house, but its got all we need and the location is wonderful.  We love it.


xo,


mONICa


Tuesday, October 25, 2011

Cute Blue Dresser

Well, I had originally planned for this post to be long and drawn out, but you wouldn't believe what a day I've had.  I don't know if I told you, but I've been having water heater issues.  We are on our third water heater and I haven't had hot water for a week and a half.  Well today, the gas company decided to pay us a visit to us for the third time to inspect our heater and well, they turned off all our gas all together saying it was unsafe. Meaning I have no hot water, stove, dryer, heat, etc.  So needless to say, I'm really hoping this is fixed by tomorrow because I can't live like this, but am glad that we are safe.

Anyway, what I was planning to show you was my kids dresser.  I got this baby for FREE.  Although, not in the best of condition, it was workable and for 3 year old twins definitely suitable.  I decided to paint it in a turquoise color and paint the hardware white, it was missing two handles so I patched up the holes and changed them with some that I already had.  I think its cute and fun.  Please excuse the temporary shower curtain I hung as a window covering in their room.


The paint is Calypso by Sherwin Williams


turquoise dresser


The stencil is Martha Stewart @ Michaels


Sherwin Williams Calypso


I also lined the drawers with some fun paperDollar Tree Wrapping Paper


Martha Stewart Stencil on dresser


I can't wait til I'm finished with their beds, artwork, window coverings, etc.


xo,


mONICa

Monday, October 24, 2011

Hello Again

So sorry I've been MIA.  I've missed you guys in blogland.  I've been so busy moving into our new home, unpacking, watching her 3 year old twins, etc. We promise the silence is over!! The move went horribly. Things are missing and things are broken. I'm the most crushed ( no pun intended) about the break of my vintage bicycle, and both of my mirrored nightstands, but they are just things so I will get over it.


Anyhoo, I've got a million projects to explore in my new house and of course we still have lots of projects to share from our shop. Your gonna love our new little craftsman bungalow. I've already been to Ikea to get a couple small things like a Bygel Utility Cart. Originally our refrigerator was in our laundry area, but I decided to move it next to the stove, which left a small gap and just enough space for the cart to fit in with extra counter space and room for pots and pans.

Here is what the space looked like before


yellow and black and white kitchenOur land lady decided to paint everything white, but I'm not mad at her since the place was in need of some tlc. I'm kind of into white walls right now anyway, that way I can add pops of color to the rooms in other ways.

cream color stove


bygel utility cartNot only is it cute, but functional


I also worked on a really free turned cute dresser for my kids room that I will show you tomorrow. Thanks for bearing with us, we promise there is so much more fun stuff to come.


Much love,


mONICa & eLAINe

Monday, May 23, 2011

Easy Peasy Pillow Slipcovers

So heres the dealio....Have you ever purchased couches that had pillows that you hated but came with?  Or even better, do you have children who ruin the pillows that you currently have?  If you answered yes to any of the questions  you should keep reading.

For me, the answer to both questions is yes.  I am a novice seamstress so I had to think of an easy peasy solution to cover my pillows.  I just love vintage fabrics and recently I've been collecting vintage linens.  I grabbed a sheet that I love ( it's actually the sheet that I used for inspiration on my art work). and made pillowcases for the existing pillows that I had.  With perfectly good cushions underneath there was absolutely no reason to throw them away.

I love the idea of using old pillowcases, sheets, curtains, or other linens because they already have finished sides.  For the novice seamstress, this means less sewing.

Here is what they looked like before:


not bad, just not me.


Here is how to make a slipcover:


1.) Measure the existing pillow cover and add an inch all around.


2.)  Cut 2 squares of each measurement (make sure you one of those sides is a finished edge.)


3.) With the patterned sided facing each other, sew the 3 sides in a straight line leaving the finished edge side exposed.


4.) This is the fun part.  Get your iron out.


5.) Press your seams flat then turn you pillowcase inside out.


6.) You are going to use iron on velcro for this step.


Its called fabric fusion.


7.) Cut about 2 short strips of each side and  1 about twice the size of the other strips.


8.) Press these on to the finished and open edge of your pillowcase with the longer strip in the center.


Before you press make sure both sides of the velcro align


You're going to want to press each side about 90 seconds.


9.) Now your going to  put your finished pillowcase onto the original cushion and velcro the open side closed.


10.) Voila!  You've got a slipcover for your throw pillow.  EASY PEASY!


These are great because you can change them with the season, or throw them in the wash when they start looking kind of grungy.


I made two.  So now my couch is slightly brighter and makes much more sense for the season.


xo,


mONICa


Monday, May 16, 2011

DIY Paintings-Complete

Okay...so once again, I'm not an artist.  However, I really needed some art for my family room.  My inspiration was a cross between a vintage sheet that I plan to repurpose as throw pillows and this flower power rug from target that I just think has a cool pattern:

Here is a photo of the vintage bed sheet:


You can see the blank wall in this post.  Here are the completed pieces.  There is really no rhyme or reason, they are just kind of random like me.


A little bit closer


And in the room showing the blue wall (I'll get a better shot on a neater family room day).


The project came in at under $20 bucks including frames. I'm actually kind of proud of them since I have failed at other attempts at art in the past.


xo,


mONICa

Monday, May 9, 2011

Coffee Table Complete

Last week I started this Graphic Coffee Table  project.  As of Saturday, it is officially complete.  Here is a quick glimpse at how if looked before.

I will warn you, the table was pretty beat up, and I didn't really touch the bottom at all and there are definitely imperfections at the base, but since I have 3 year olds, I figured perfection wouldn't last long anyway.  Plus...this is not my forever coffee table, just a temporary fix until the kids get a little older and stop doing super hero jumps off off my tables.


Instructions:


1.) Sand the table just enough so that the paint will grip.


2.) Apply a coat of primer. (Don't use oil based, it takes too long of dry and may cause bubbling)


3.) Apply your base coat. (I used the Ecru color that is on my family room walls)


4.) Apply you tape lines. ( I did a simple Hollywood regency inspired graphic)


5.) Apply your top color. (May take a couple coats)


6.) Remove your tape and touch up. (Yup, that right, tape lines aren't always perfect so you may need to go back over with a fine brush to straighten up your lines)


7.) Apply 3 coats of lacquer ( I used spray lacquer, no sanding between coats)


The final product should look something like this:


I thought this was a fun way to jazz up a worn table top...It would be a fun project on any table, maybe even for a faux inlay around a dining table.


xo.


mONICa


Thursday, May 5, 2011

Graphic Coffee Table

I thought I'd stop by to show you what I've been working on,this week. Besides trying to finish my series of artwork, I've been working on a coffee table project.  Last week I had mentioned that I was looking into decoupaging my coffee table after it had been pretty beaten up.  Well, after an unlucky trip to the fabric store, I decided to paint it instead.  Not only will I get something closer to what I want, but it is a more frugal alternative.  Anyway, this is what is looked like before.

When I bought this table, I loved it.  I loved the inlay look and the mid-century/ West Elm lines.  What I didn't like is that it was slightly beaten up, but since I have 2-year-old twins,  I figured it was just gonna get beat up more.  Well, it did.  Now that I have my home for sale I decided that the room needed to be a bit more tidy, yet practical so I decided to paint the table, so that hopefully it looks nicer.

Here is the progress.  Full DIY instructions to come when the project is finished.


Unfortunately I forgot to take photos of the taping, but you get the idea.

xo,

mONICa

Monday, April 25, 2011

DIY- Pantry Makeover

I decided I was going to show you pictures of my pantry.  First of all, don't laugh at me, as my cabinets are empty and I really need to get to the store.  I'm definitely not an extreme couponer with my stockpile bursting at the seams.  What I do like however, is a place for everything and everything in its place.

When we purchased this home it had a pretty standard pantry with wire racks and closet sliding doors.  It was really hard to get anything large into the pantry because the closet doors got in the way.  So we decided to change the doors to double doors to make it more accessible.  I got rid of all the wire racks and was lucky enough to find some BESTA shelves on clearance at Ikea( never overlook the as-is section).  They were the perfect size for my pantry.  I stacked one on top of the other and then added a wine storage box and an espresso colored closet shelf to the top from Lowes.  Screwed and L-bracketed everything in its place a wha la!  I have a custom pantry.  For a cost of only $125.00.  For can storage I bought some wire pantry shelves for the doors.  I also have baskets for boxed goods (pasta, rice, tea, etc.), kitchen towels, and fruits and potatoes, Now I have a clean-looking, efficient space.

Wire pantry organizers keep cans in place.  Wine storage is great for storing wine and other beverages (2-liter soda, juice, etc.).


Full view


Baskets are great for storing fruit, potatoes, and dry goods.


xo,


mONICa